 FITTING INSTRUCTIONS
Models;
14” Standard
15” Standard
16” Standard
16” Super Standard
16” XT
16” Heavy Duty
17” Standard
17” Super Standard
This manual details the instructions to install the Rodgard Runflat system on one piece drop center wheels equipped with safety humps.
Notice:
Failure to follow these instructions may result in component failure and reduced performance.
This manual details the instructions to install the Rodgard Runflat system on one piece drop center wheels equipped with safety humps.
Notice:
Failure to follow these instructions may result in component failure and reduced performance.
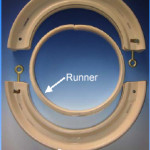

The Run Flat system is installed during the tire installation. It is shipped from the manufacturer as a completely assembled unit, and consists of two major components: the Runner and Roller. (ref. Figure 1)
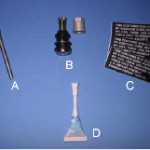
Hand Tools and Equipment (Figure 2)
•Spanner Adjustment tool (provided) (A)
•Metal tire valve (provided) (B)
•Installation Labels (provided) (C)
•Loctite lubricant (provided) (D)
•9/16” socket extension ratchet
•Standard tubeless tire mounting tools
•Standard tire mounting machine
•Wood blocks
Please note: To help assist with installation, some photos do not depict the lubricant on the roller and runner.
INSTALLATION:
For first time installation, it may be beneficial to install the system on the wheel without the tire. This will allow you to become familiar with the steps prior to full installation.
1. Separate the two roller segments by removing the cross bolts of each section.
2. Do not remove the factory installed lubricant. This is a special, high temperature lubricant that will not harm the tire.
3. Remove the existing rubber valve from the wheel and replace with the metal valve supplied. Also, remove the thumb screw from the spanner nut and keep in hand.
4. With the outboard side of the wheel facing up, install the tire beads on the wheel. Remove the upper bead only. The lower bead can be seated or unseated based on the installers preference.
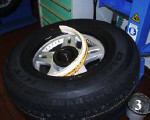
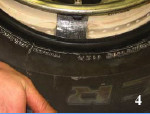
5. Raise the upper bead and insert the runner as shown in Figure 3. Be sure the side marked “OUTBOARD” is facing up. Pushing down on the tire at the valve stem location, verify the valve stem is in the opening of the runner. (Figure 4).
Once the runner is in place, reach inside and pull the runner up to ensure it is seated correctly within the drop center of the wheel.
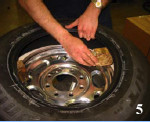
6. Place a few wood blocks between the wheel and tire as shown in Figure 5. This will allow clearance to install the roller sections
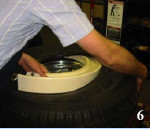
7a. With the roller “OUTBOARD” side up, snake the roller into the tire as shown in Figure 6 7b. Repeat this for the 2nd half, making sure the eye bolts are in the proper orientation. Refer to Figure 1 for the correct orientation.
8. Reaching inside the tire, rotate the eye bolts and engage the bolt within the other roller section. Rotate the entire unit until the hardware location of the rollers is approximately 90°from the valve stem.
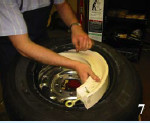
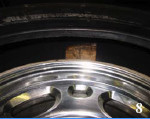
9. Place blocks of wood between the tire and rollers to keep the roller engaged with the runner. (Figure 8)
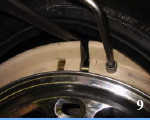
10. While pulling the tire bead back with a tire iron, orient the eye bolt so the eye is visible through the slot in the roller. If necessary loosen the spanner nut.
Insert the cross bolt and tighten with a 9/16” socket extension ratchet until snug. (Figure 9). Complete for the other location.
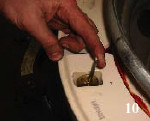
11. Use the spanner tool to tighten the rollers together. (Figure 10).
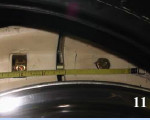
Tighten both ends equally until the roller has a gap approximately equal to the gap noted on the Roller Gap Form included with these instructions. Use a standard tape measure. (Figure 11) (Approx. 6mm)
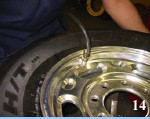
12. Apply loctite to the thumb screw and thread into the spanner nut. Use hand pliers to tighten until snug (Figure 12)
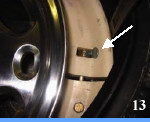
13. Rotate the thumb spanner toward the outside of the tire until contact is made. (Figure 13)
14. Be sure to remove all wood blocks and tools from the inside of the tire.
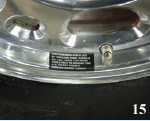
15. Place lubricant on the outboard tire bead and install. Inflate the tire to the recommended tire pressure. (Figure 15)
16. Balance the wheel and remove excess lubricant from the exterior of the tire.
17. Place the installation label on the wheel to specify a runflat is installed. (Figure 15)
17.Mount the Wheel –You are finished!
18. Keep the instructions and installation tools with the vehicle spare tire to facilitate future tire changes.
Fits standard rim sizes: 13″ 14″ 15″ 16″ 17″ 17.5″ 18″ 19.5″ 22.5″
For Family Cars, Trucks, Vans, Police, Fire, Safety Vehicles
Please note: specifications and information listed on this page are subject to change without notice.